A few years back Google apps used to be my choice of service for creating domain-specific business email addresses. But last year they shut down their free sign-up and now you need to pay for every user account on Google apps. For those who are looking for free domain-specific email options, you still have a couple of option such as using your domain provider or use cPanel to create a free email account or use Zoho mail.
I discovered Zoho Mail free domain email address feature a few days back, and it’s indeed something which you will love. They also have a premium option (With additional features), but if your requirement is up to 10 users, the free version will suffice your need. In this detailed guide, I will show you how to set up your domain Email address for free using ZohoMail.
Step by Step Guide to Create Business Email using ZohoMail:
The signup and set process are easy and it took me only 7 minutes to complete all the steps. To get started, go to their free mail signup page here and enter your domain email address.
Click on Add domain and on next page, fill up the sign-up form. You can add any email address (For example here I added “admin”), you can use your name or anything else. You can always add 9 more email accounts in the free plan.

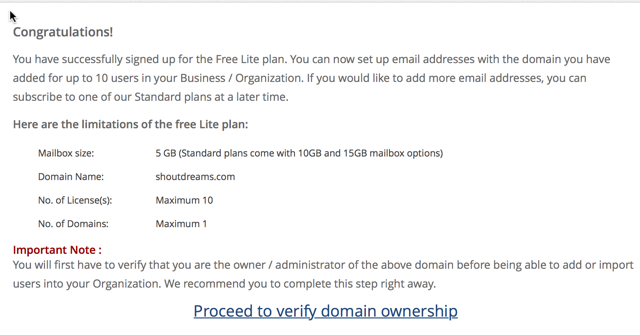
On the next page, you will get a confirmation for your sign up for the free lite plan. Here is a screenshot of my confirmation page:
Verifying Domain ownership on ZohoMail:
Click on “Proceed to verify domain ownership” and you will be taken to the page to verify domain ownership. They have three options for now “CNAME, TXT and HTML file upload“. HTML method is the simplest as you just need to download and upload a file to your root-server. Moreover, HTML verification is the fastest.
You can use cPanel FTP manager or use FileZilla on the desktop to connect to your web-server. Here is a guide to learn using FileZilla FTP. Once you have verified your domain using any of the three methods, you will get a success message like below and you need to continue with business email setup.
Update MX record to complete Zoho business Email setup:
One important step which you need to do to enable your business email is by updating the MX record. Click on Change MX record and it will show you what MX record you need to use to enable it on your website. In this case my above site is hosted on Hostgator, so I will simply login to my Hostgator cPanel, click on MX entry under mail section and select domain name on the next page. Now all you need to do is to add the MX record shown on the Zoho domain email configuration page.
Once you have added MX record, go back to Zoho domain setup and finish the process. By the end, you will be in your dashboard which you can access anytime here. Zoho offers a great solution in their dashboard for business emails including branding, domain aliases, spam filter and many more. Here is a screenshot of the Zoho mail control panel:
Well, this is not all, as Zoho also offers mobile apps (iOS and Android), and I tried their iOS app which is par excellence.
After Google apps retired their free Google apps account, I was always in constant search for something which is as good as Google apps, and Zohomail fit perfectly into the category. I’m not covering their pro plans but you can see their pro plan features over here.
If you are an existing Google apps user, Pricing is another factor which will make you prefer ZohoMail over Google apps. You can migrate your existing Google Apps account and mails to them using their migration tool and a help guide can be found here. To access your email simply login to mail.zoho.com.
You can try rest of the features by creating your own free or paid Zohomail account and I bet you won’t be disappointed. If you are using any other service to get free business email address, do let me know via comments. Don’t forget to share this guide with others on Facebook and LinkedIn.


No Comments
Leave a comment Cancel